Saturday, September 29, 2012

Pumpkin Snickerdoodles

You could say that this week has been a spiral for me. It all started when I was out running at the beach last weekend (belated "Happy 3-0 Birthday" to sister!), and I spotted this sign:


Well, that planted the pumpkin seed in my head, and it left me with two choices: water that seed with pumpkin love or deny it food and let it die. Guess which one I picked?


After that, it's been all downhill. Now there are a few of these in the fridge (and perhaps one on the coffee table next to me):


Even worse, the pumpkin baking has begun. First official recipe of pumpkin season (which coincides with soup season but is shorter in length, for those concerned minds out there): pumpkin snickerdoodles. Intense pumpkin flavor with sugary-spice coatings. Do I really need to say anything else?


Don't worry, I already have the next pumpkin baking project picked out.

Pumpkin Snickerdoodles
Recipe from A Bitchin' Kitchen

Cookie Ingredients:
3 3/4 cups flour
1 1/2 teaspoons baking powder
1/2 teaspoon salt
1/2 teaspoon ground cinnamon
1/4 teaspoon ground nutmeg
2 sticks unsalted butter, room temperature
1 cup sugar
1/2 cup dark brown sugar
1 cup pumpkin puree
1 large egg
2 teaspoons vanilla extract

Coating Ingredients:
1/2 cup sugar
1 teaspoon ground cinnamon
1/2 teaspoon ground ginger
Dash of allspice

Directions:
In a medium bowl, combine flour, baking powder, salt, cinnamon, and nutmeg. Whisk together to blend. In a large bowl, beat together butter and sugars on medium speed until well combined. Next, still on medium speed, beat in pumpkin. Then, add the egg and vanilla extract. Lastly, add in the dry ingredients. Beat until combined, but do not over mix. Cover the dough, and refrigerate for one hour, until firm.

Preheat oven to 350 degrees.

Line baking sheets with parchment paper. In a small bowl, mix together the sugar and spices for the sugar coating. Scoop dough (approximately 2 1/2 tablespoons) and roll into a ball. Roll the dough ball in the sugar mixture, and place on the lined baking sheet, leaving about 2 inches between each cookie. Take a drinking glass with a flat bottom and moisten with water. Dip the glass in the sugar mixture, and use it to flatten the dough balls. Re-sugar the glass as needed.

Bake the cookies for 10-12 minutes. Remove when the centers of the cookies have set. Let cool on the baking pan for approximately 5 minutes, and then transfer to wire cooling racks to cool completely.

Thursday, September 20, 2012

Easy Turkey Chili

 This time of year always has me uneasy. As a warm weather girl, the idea of shorter days and fewer rays of sunshine make my heart ache. But at the same time, there’s just something about crisp, fall air that makes me excited to go to town warming up with homemade soups and broken-in sweatshirts.

Last weekend, there was less moisture in the air (and frizz in the hair), and it truly felt like fall was nearing. Other folks might be rejoicing about football season, but in my kitchen, we’re rejoicing for soup season! It’s finally here, and we wasted no time in ushering in the good times.

First up was a natural choice: chili, the trustiest soup a homecook can make. It’s homey, spicy, and warms both body and soul. I can make it a thousand times and still crave more. To make this even more user-friendly, I threw this in the slow cooker. Not only is it great to walk in the house to the smell of spicy goodness, but it also gives the flavors extra time to meld together and develop complexity. If you’d rather use the stovetop, just let the chili simmer as long as you can before you serve. 


Easy Turkey Chili

Ingredients:
1 onion, diced
3 cloves garlic, minced
1 tsp. chili powder
1 tsp. oregano
½ tsp. cayenne pepper
16 oz lean ground turkey
2 yellow squash, diced
1 green pepper, diced
1-2 jalapeno peppers, minced (adjust to your spice liking)
14 oz. can of golden corn, drained and rinsed
14 oz. can of black beans, drained and rinsed
28 oz. can of diced tomatoes with juice
¼ cup tomato paste
1 cup chicken stock
1-2 tbsp. chili powder
2 tsp. oregano
1 tsp. cayenne pepper
Dash of cumin

Directions:
1. Saute the onion in a large skillet until translucent. Add in garlic and continue sautéing until fragrant. Add in first round of spices.
2. Brown the ground turkey in the skillet.
3. Add the turkey-onion mixture and all remaining ingredients into a slow-cooker. Mix thoroughly. Cook on low for 8-10 hours. Serve with a slice of fresh avocado, a sprinkle of cheddar cheese, and a dollop of sour cream!

P.S. I thought you would enjoy this photo—my morning commute was interrupted unexpectedly on Wednesday morning when the track, and the metro train I was on, lost power in a tunnel between stations. We were stuck for about an hour, but it was long enough to make friends and begin planning a return to home to work in pajamas for the remainder of the day. Sadly, power came back on, and ultimately, I was off to work. A little spice for the middle of the week!


Friday, September 14, 2012

Homemade Oreos

One of the most welcome parts about living on the east coast again is being able to join in for all of the family gatherings that occur throughout the year. Rather than getting my yearly fix of family at the holidays, I get to celebrate promotions, birthdays, holidays, Fridays, and any other “days” that merit a meal with the people who share your DNA. 

While the idea would be that these festivities are distributed throughout the year, the Berlin clan ups the ante. Of our immediate family, three out of four have birthdays within 4 weeks of each other. Now I’m not saying which member has a totally unique, special, and original birthday outside of those four weeks, but I will give you the hint that I happen to be in charge of multiple baking projects in September/October! 

Figure it out? I knew you were smart. 

Birthday #1: the papa’s. This is a man who raised me with the mantra, “Oreos are a food group.” Naturally, a homemade version was in order. 

In good faith, I can’t tell you that these tasted EXACTLY like the real thing. The wafers are a different texture, and the filling is a little heavy on the vanilla. However, that does not take away from the fact that I would eat these cookies every day and twice on Sunday. 

Next up: celebrating the end of sister’s years in her 20s. Baking ideas? 


Homemade Oreos
Recipe adapted from Smitten Kitchen

Ingredients for the chocolate wafers:
1 1/4 cups all-purpose flour
1/2 cup unsweetened cocoa
1 teaspoon baking soda
1/4 teaspoon baking powder
1/4 teaspoon salt
1 cup sugar
1/2 cup plus 2 tablespoons room-temperature, unsalted butter
1 large egg

Ingredients for the filling:
1/4 cup room-temperature, unsalted butter
1/4 cup vegetable shortening
2 cups confectioners’ sugar
2 teaspoons vanilla extract

Directions:
1. Set two racks in the middle of the oven. Preheat to 375°F.
2. In a food processor, or bowl of an electric mixer, thoroughly mix the flour, cocoa, baking soda and powder, salt, and sugar. While pulsing, or on low speed, add the butter, and then the egg. Continue processing or mixing until dough comes together in a mass.
3. Take rounded teaspoons of batter and place on a parchment paper-lined baking sheet approximately two inches apart. With moistened hands, slightly flatten the dough. Bake for 9 minutes, rotating once for even baking. Set baking sheets on a rack to cool.
4. To make the cream, place butter and shortening in a mixing bowl, and at low speed, gradually beat in the sugar and vanilla. Turn the mixer on high and beat for 2 to 3 minutes until filling is light and fluffy.
5. To assemble the cookies, spread or pipe frosting onto the center of one cookie. Lightly press onto another cookie, to work the filling evenly to the outsides of the cookie. Continue this process until all the cookies have been sandwiched with cream. Makes about 20 sandwiches. 


Note: These do not lend themselves to birthday candles. We had to do a last-minute quick fix: birthday cantaloupe with a side of homemade oreos :)

Roasted Mustard Potato Salad

Every once in a while, a recipe just lands in your lap with such perfect timing that you’d be a fool not to give it a try.

Picture this: it’s the day after a long weekend filled with celebrations and indulgence. You go to the grocery store to pick up a few odds and ends, but inspiration is really lacking for how to make these items into a cohesive meal. You proceed to the checkout repeating your mantra, “I’ll just throw a few of these things together and figure something out.”

No sooner do you walk into your apartment, grocery bags in tow, when your phone gives its friendly “ding” alerting you of a new email. Procrastinating unpacking, and even more, delaying the moment where you actually have to make good on your promise to figure something out, you give in to the phone’s alert and check your email.

Lo and behold, it’s a recipe that someone thought you might enjoy. Even better, it’s a recipe for which you just bought the main ingredient at the grocery store.

Serendipitous, isn’t it?

To call this a potato salad might be misleading. I’d consider it more of a fancied-up version of your mom’s potatoes. It’s warm, spiced, and keeps you coming back for more. Thanks for the tip, Barb!


Roasted Mustard Potato Salad
Adapted from All Recipes

Ingredients:
6 Yukon Gold potatoes, cubed
1/4 cup canola oil (or less)
3 tablespoons distilled white vinegar
1 tablespoon Dijon mustard
1/2 teaspoon celery salt
1/4 teaspoon pepper

Directions:
1. Preheat oven to 450F.
2. Bring a large pot of salted water to a boil, and cook potatoes 10 to 15 minutes, until tender but firm. Drain, and transfer to a medium bowl.
3. In a small bowl, mix canola oil, vinegar, Dijon mustard, celery salt, and pepper. Toss 1/2 the mixture with the potatoes.
4. Arrange potatoes in a single layer on a sheet of foil, and place flat on a roasting pan. Turning occasionally, roast 10-12 minutes, or until lightly browned. Remove from heat, and cool. Toss with remaining oil mixture to serve.

Monday, September 3, 2012

Banana (Choco-Bourbon) Nut Bread

A week away from home is not a terribly lengthy time. But it's long enough to make you miss certain things. Like a bed that smells like fresh detergent or pillows that put your head in that perfect little cradle. Not to mention the familiar hum of your home's individual noises, or a closet that has all of the shoes/dresses/skirts/earrings/anything you could want all in one place. And it's not so bad to come home to your S.O., especially after a week of small talk and chatting up strangers.

For a work trip, the week was actually quite nice! I got to spend some quality time in Baltimore, catching up with old friends included. And then I hopped on over to Minnesota for the ever-exciting Minnesota State Fair, don't you know! Fried food on a stick and good midwestern hospitality made the trip a true pleasure. 

Beautiful view for a lunchtime run
By the time I got back, I was itching to get my hands dirty in the kitchen. I've also been accused by a nameless someone that I only bake for other people, rather than baking for fun to keep around the house. I'm pretty sure my waistline is the reason for that, but nonetheless, I can't be developing any kind of reputation as a stingy baker! With a handful of overripe bananas staring me in the face, banana bread was the clear frontrunner. I decided to make this bread really decadent and throw in the leftover chocolate chips that were sitting in the pantry, as well as a dash of bourbon to make the bread feel a little rebellious. One slice is already gone...now let's see how long the rest of the bread sticks around!


Banana (Choco-Bourbon) Nut Bread

Ingredients:
3 ripe bananas, smashed
1/3 cup melted butter
3/4 to 1 cup brown sugar
1 egg, beaten
1 teaspoon vanilla
1 tablespoon bourbon
1 teaspoon cinnamon
1/2 teaspoon nutmeg
1/4 teaspoon allspice
Pinch of ground cloves
1 teaspoon baking soda
Pinch of salt
1 1/2 cup of flour
1/2 cup walnuts, chopped and toasted
1 cup chocolate chips

Directions:
Preheat the oven to 350°F. Toast the walnuts and set aside. With a wooden spoon, mix butter into the mashed bananas in a large mixing bowl. Mix in the sugar, egg, vanilla and bourbon, then the spices. Sprinkle the baking soda and salt over the mixture and mix in. Add the flour and mix. Lastly, add the nuts and chocolate chips. Pour mixture into a buttered 4×8 inch loaf pan. Bake for 50 minutes, or until a tester comes out clean. Cool on a rack. Remove from pan and slice to serve.

Williamsburg Orange Cake & cake icing tip

One of my favorite things about summertime is the flurry of celebrations that spring up as people take advantage of the of the warm glow of long summer days. Put a glass of wine in my hand, stand me on a porch surrounded with fun company, and I feel like I've landed in heaven every single time. 

MM and I have had the fortune to spend not one, not two, but three weekends in a row partaking in these summer celebrations, and there's still a few more to come this month! Big congratulations are in order for Lindsey & Jason, Brendan & Jamie, and Mr. G for their two weddings and a birthday (sounds like a movie title, doesn't it?).

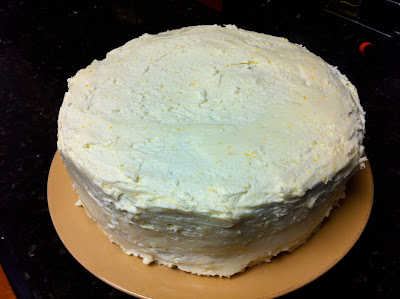
Unlike the catered weddings, the birthday party had openings for food contributions, and I was all too happy to jump in the kitchen and get to baking. Little did I know, I was going to be in charge of making the birthday boy's cherished favorite cake. No pressure, right? 

Fortunately, all went according to plan. And when the birthday boy tasted the cake, I received the coveted verdict: "Welcome to the family!"

In addition to the recipe below, here's a tip for icing the cake that my clever mother shared with me, and it only seems right to share with the baking world. Rather than worrying about moving the cake once it's iced or having to wipe down the plate without disturbing the cake, there's a simple way to keep your serving plate frosting-free as you ice the cake. Simply tear small pieces of tin foil or parchment paper and place them around the rim of the plate so that the edge of the plate is covered all around. Then, set the cake layer on top of the small pieces. Ice the cake as you would normally, and then all you have to do is remove the small pieces of foil at the base, and you're left with a clean serving plate and a fully iced cake.


Williamsburg Orange Cake Recipe from Betty Crocker's Cookbook (1969)

Ingredients:
2-1/2 cups flour
1-1/2 cups sugar
1-1/2 t. soda
3/4 t. salt
1-1/2 cups buttermilk
1/2 cup margarine, softened
1/4 cup shortening
3 eggs
1-1/2 t. vanilla
1 cup golden raisins, cut up
1/2 cup finely chopped nuts
1 T. grated orange peel

Directions:
Heat oven to 350 degrees.
Grease and flour 13" x 9" x 2" baking pan, or two 9-inch round layer pans, or three 8-inch round layer pans.
Measure all ingredients into large mixer bowl. Blend 1/2 minute on low speed, scraping bowl constantly. Beat 3 minutes on high speed, scraping bowl occasionally. Pour batter into pans.
Bake 13" x 9" x 2" pan 45 - 50 minutes, or until a wooden pick inserted in the center comes out clean. Bake layers 30 - 35 minutes. Cool. Frost with Williamsburg Butter Frosting.

Williamsburg Butter FrostingRecipe from Betty Crocker's Cookbook (1969)

Ingredients:
1/2 cup soft butter or margarine
4-1/2 cups powdered sugar
4 - 5 T. orange-flavored liqueur or orange juice
1 T. grated orange peel

Blend butter and sugar. Stir in liqueur and orange peel. Beat until smooth.